
Little
Leona's 4th birthday was coming up, and it had to be a Lillifee cake. You've
probably seen a few barbie cakes already with the actual cake being the dress.
That's what we wanted to do. We've never done this kind of cake before so we
looked up pictures and videos of how people did it. We especially liked the
Video of Ann from How To Cook That.
We couldn't
find a Lillifee doll to buy so we decided to make one out of fondant. In this
part I'll show you how to make it.
Start by
coloring modeling fondant with Ivory / Caramel and a little bit of peach.

Then
you gotta divide the fondant into the parts for body, head and two arms.
Unfortunately, I've thrown away the note of how many grams we've used for each. So
just give it a go =)
The body
will eventually be tucked into the cake so make it a little longer than usual.
If it's too long, you can always trim it later.

Roll out a little "sausage" of
fondant and cut it at an angle in half (1). The sloped end will become the hand
later on. You now form the wrist by rolling the arm gently between your index
fingers, then press down on the hand to flatten it (2). Use your index finger and
thumb to pinch the elbow at roughly half the arms length (3). Bend the arm as
far as you need it for your figure (bent/ half streched out/ ...). Next, press
lightly on the hands from all sides until your happy with the basic shape. Then
make a little cut for the thumb. Just make sure to give your figure one left
and one right thumb by placing the cut on the opposite side ;) (5.). Continue
with the other fingers by making three more cuts (6.). Once your done with
this, shape the fingers until your happy with the result and bend them. You can
use any tool, just decide for yourself what works best for you. To make sure
the arm has the right size, hold it next to the body and adjust if needed (7.).
At last, use some sugar glue to attach the wires to the arms. That way the arms
will stick to the body easier (8.).

Dont worry if your figure doesn't look 100% real
at this point. Once the dress is on, it will look good. I poked two shashlik
sticks into the body to pin it to the cake later on.

The head is always the most tricky part, but
the more often you do it, the easier it gets.
Start by shaping out a slightly oval ball and
use your little finger to press down horizontally across the face where the
eyes are supposed to be. Then you gently push the fondant from the outside to
the inside, thereby creating the bridge and the tip of the nose (1). Make a
little cut for the mouth (2). Now take a longish tool - I've used a mini spoon
tool, place it in the mouth and move up and down to arch the lips (3). In
the next step you continue shaping out more the lips and nose. Take a pointed
tool and make two little indents for the nostrils and the corners of the mouth.
This also decides how happy your face will look like eventually (4.). Now let's
work a little more on those eyes. Take your pointed tool again, press in the
eye sockets and shape them. Above and below the eye you want to create small
furrows for the eye lids (5.). By the way, you should also shape the so called
philtrum, the groove on your upper lip. Place a little cut in the middle and
push the fondant from both sides towards the center (6.). Congrats - the hardest part
is done! You can easily spend hours shaping a face until your satisfied. My
head had started to flatten, even though I had placed it on a corn starch
sachet. But that's not too bad, if that happens to your head too, you can press on it a little and get it back into shape. Also, the hair will
eventually cover it up. For that you take some fondant in the color of the hair
and "fill up" that dent in the back (7.). Finally, place two little
balls of fondant in the eye sockets. It helps to give them an almond-like shape
before inserting (8.).

By now should know which eye color you want to
have. Lillifee has blue eyes so we stuck to that. To cut out the iris, you
simply use a small piping tip. Put some glue on it and place it onto the eye,
adjusting it with a toothpick. We have a pen with edible color (Jet Black from
Rainbow Dust) so we used that one to make the pupil.

For the hair, roll out a thin sheet of fondant
and cut out a rectangle. Put some sugar glue on it and place it on the head
like a headscarf. Twist the end like shown in the picture, cut off the excess
and smooth out the seam. Now place the head with a toothpick, cake pop stick or
wire onto the body. That way you can work on the hair easier.

Lillifee has a bit of a messy hairstyle, with
curls all over it. For that we used the Ultimate Clay Extruder. Its very easy
to get fondant strands that are evenly thin. Don't make the mistake to produce
too many at the same time because they start to dry out rather quickly and you
won't be able to twist them all in time. Take every single piece of strand
individually and roll it up on a shashlik stick, then gently pull it off. Let
them dry for a good amount of time until they're stiff enough to be worked on.
Start close to the face with the first few
streaks, then go to the bottom of the back and work your way up until they meet.
Take a few smaller streaks and place them on the top of the head and above the
forehead. When your done with this, its hair dresser time! Take a nail scissors
(not used, of course ;) ) and trim the streaks. You can also use wire to help
them stick out. Put the wire in the head and leave to dry overnight.

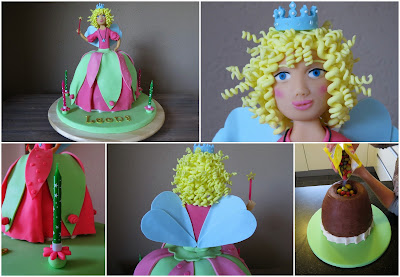
On the pictures you can see she's wearing her
top already. Let me quickly show you how I've made it. Cut out the shape of a
rough rectangle and cut out the middle as shown in the picture. This will be
the hole for the neck. The width of this rectangle should be half the
circumference of the body. Place the fondant on the body to see if the hole is
big enough. If not, remove and cut out a larger circle until it fits. Place the
dress with the long sides to the front and back on the body and press together
the sides underneath the arms. If there's too much excess, cut it off and smooth
out the seams. At the hips, smooth out the bottom of the dress. It might be
needed to place some sugar glue onto the body. You can do that now at this
point once the dress is correctly in place.

To start with the sleeves, we gave Lillifee "water wings". That way we could easily create that puffed sleeve look. Again, cut
out a rectangle and trim the edges as shown. Take the longer side and push the
fondant together to create the fluff, then place it around her arms with some
sugar glue and smooth out the seams. I have to tell you, that dress required
quite some work, especially because it's so small.

That was part 1 of the Lillifee cake. I hope
you could understand everything, if not feel free to ask.
by Christina
Keine Kommentare:
Kommentar veröffentlichen